Behind the scenes of the waterproof jacket: the Blackshell³ 🌑

What is a 3rd layer or hardshell?
The waterproof jacket is in the category of 3rd layers or hardshell. In our case (for trail running 😉 ), it is a jacket whose purpose is to protect from external elements and bad weather such as rain, wind, snow... While having properties suitable for running. Indeed, if we forget this point, we might as well run with a garbage bag or a tarp 🧐

When a garment is waterproofWhen a garment is waterproof, it means that it limits the penetration of water in liquid form (like rain). The waterproofness of a fabric can be worked on by adding a polymer coating (a plastic layer, like the yellow oilskins) or by combining this fabric with a technical membrane. This membrane being too fragile to be used in only one layer, it is generally laminated/sandwiched with 1 or 2 layers of another fabric bringing other properties: resistance to rubbing, absorption of moisture...
A fabric is said to be breathable when it evacuates the water vapor generated by our body during the effort, in the form of perspiration. The more the fabric allows this moisture to pass to the outside, the less it will accumulate. On the other hand, if the fabric is not breathable enough, it will retain moisture that will condense and make us wet.
And what about race certification?
For mountain races of more than 15km, it is common to find in the list of mandatory equipment a "waterproof jacket". This is a jacket with a hood and waterproof seams. In a classic seam, when the needle passes through the material, it creates a tiny hole. To be waterproof, the seam is sealed with tape (an adhesive tape) that seals the perforations.

What is a good waterproof jacket for trail running?
To meet the needs of the runner and to protect him/her as well as possible from external conditions, here are the prerequisites:
- A water-repellent outer material, which allows water drops to slide off the jacket quickly
- A technical membrane, which allows the passage of moisture generated by the body during activity, in the form of evaporation (from the inside to the outside) and which blocks the passage of water in liquid form (from the outside to the inside), like rain
- A construction that limits unnecessary seams while maintaining good mobility (finding the right balance is not always easy). Dividing the jacket into several panels that articulate can increase mobility but also increases the risk of getting waterlogged, if seam faults appear over time. Also, in general: more seams means more areas to seal and therefore more time to make, and therefore more cost.
- High-quality workmanship, which guarantees a perfect seam seal
And the Wise jacket in all this?
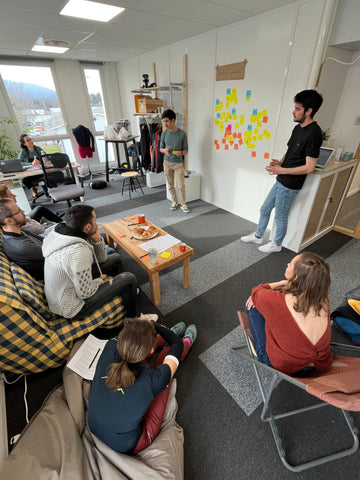
It all started, as always, with our community. But this time, instead of doing the development hidden behind our computer, we organized a workshop in our premises with a small group of passionate runners.
Workshop n°1: The sensations and emotions of trail running: what brings us outside, to run and to walk the trails?
The main reasons and criteria that were discussed in this session were:
- The surpassing (self-confidence, approaching your limits...)
- The freedom (the adventure...)
- Introspection (release emotions, refocus, feel alive...)
- The nature (to evolve in an environment, to connect to one's senses...)
- The trail spirit and the community (sharing, meetings...)
- The challenge (races, season objectives, training plans...)
On the other hand, the idea of maximalism (accumulation of equipment) or crowds (during major races for example) can sometimes be experienced as a consequence that is "suffered" rather than a desired situation.
Workshop n°2 : How is your current jacket?
We went through the different jackets we had to see what details killed and what details stunk.
→ Louise: "My jacket has small pockets, an articulated hood with a headband, a sober design and a chest pocket."
→ Christophe "My jacket has a compacting pocket so I can pack it away quickly, without it taking up too much space in my bag (or in your sherpa 😉 )."
→ Marie: "My jacket has an adjustable hood that follows my movements and protects me even in windy conditions."
→ Gauthier: "My jacket has a gusset in the back, which opens when I wear my bag underneath the jacket to protect it and my stuff."
→ Anaïs: "My jacket packs down into its waistband, so it can be put on or taken off quickly. However, the seams do not seal over time."
→ Mathieu: "My jacket is colorful and it has reflective details to be seen in the dark. "
During the discussion, we realized that when the weather was not nice, we could have a tendency to be cold in the extremities and that it is always the fight to have access to his watch...

In the end, the killer details that were brought up were:
- A watch pass
- An integrated mitt to protect from the rain
- A thumb loop
- Reflective elements to ensure good visibility
- An easy to put on zipper with an ergonomic pull tab
- A compaction pocket
- An articulated hood that follows the movement and protects even in gusty conditions
- A gusset to carry the bag under the jacket and protect your belongings from the rain
What can we learn from these two workshops?
The first workshop allowed us to identify the sensory criteria to work on for a positive experience of use in trail. The second workshop, more concrete, allowed us to realize a benchmark (or market study) on the jackets already present on the market, to draw advantages and disadvantages.
If we connect what we have learned and identified, this is our interpretation:
1/ The garment, in its physical dimension, influences above all the criterion of freedom. In order not to hinder this need and feeling, it seems to be important to focus on the fit of the jacket (comfortable, rather loose), on the stretchy and light material, which doesn't stick to the skin or bring a plasticized feeling. To feel the least constraint, we also focused on the easy-to-use zipper that would allow everyone to make their own suit. A double slider to be able to open only the bottom of the jacket, if you want to access the pockets of your shorts or your belt or ventilate, for example.
2/ For the criterion of surpassing oneself, one must feel confident. So we looked at accessorizing: a protective, articulated hood that doesn't encroach on our field of vision, as well as a pass-through to make sure the sleeve doesn't move and to be sure we're always protected.
3/ To challenge yourself, we thought of those who prepare their training with meticulousness and who are ready to brave the elements to do their session. So we thought of a watch pass that would allow you to keep an eye on your performance and your goals.
4/ For nature, our jacket must not contain harmful elements and must not have a negative impact. It also seemed important to work on the visibility of the jacket in its environment.
The brief is pretty clear. Our hardshell won't be the most minimalist, but it will have well thought out details.
Searching for solutions:
For this jacket, the most complicated and technical part was the sleeve end. Indeed, we have to succeed in finding a solution to combine a pass-through, a pass-through and a mitt while remaining as efficient as possible 😅 We also have to keep the objective in mind: the jacket has to be waterproof and remain consistent on the choice of solutions and materials.

I explain: we could easily add a kind of mitt that would cover the hand, but if the material is not waterproof, the main function is not validated. If we make this extension with the waterproof material, we can reduce the comfort and have a piece of the sleeve that makes "floc floc" when we run. If you want to maintain it, you can add a patch (like a snap, a self-gripping band, a magnet...). Not very nice, not very light, not very minimalist. Combining the needs, the tech, the functions while remaining the most minimalist, that's the big challenge!
To think and test, sometimes the easiest way is to make paper mock-ups (with staples!). Then, to check the behavior of the fabric, I make a "moke-up" of the piece in question. The goal is not to have a final or usable rendering, but to see if the concept works as a whole.
Once the technical solutions have been found, the design has been fine-tuned and the technical file has been drafted, it's time for the pattern makers to work. At this stage, the first phase of design is finished. We can then send all the documents and the pattern to our workshop for prototyping.
The first prototype : The first draft.
In the best case, this first prototype is functional. However, it is very often necessary to rework the volume so that the garment falls in line with our silhouette and that the finishing touches are consistent with our positioning.

This time, we had the chance to discover the prototype directly at Petratex and to debrief all together on the issues related to the garment and prototyping. We were able to test our fabric and the strength of the seams in their laboratory.
Back in Annecy, time for fitting sessions and field tests with several people. Here is what we noticed :

- The compaction pocket is not functional.
- Some seams are superfluous and can be optimized.
- The shape of the sleeve is inconclusive → modification and improvement of the design.
- Optimization of the pattern and material consumption by modifying the shape of some parts.
- Aesthetic details and finishes can be fine-tuned.
- Some accessories (zip and elastic etc.) are replaced by others more adapted.
- The overall volume is adjusted to have a comfortable but not too loose jacket.
- The hood is optimized to fit a variety of head sizes.
- The back gusset is modified to accommodate a standard trail vest.
- The tape used to seal the seams is not waterproof enough.
And here we go again, updating the drawings, the technical file and the pattern to go back to the prototyping.
The second prototype
At this stage, we have a jacket that really starts to look like a real jacket! We could this time realize 2 prototypes in 2 different sizes to be able to test them thoroughly by several profiles of traileurs/trailers.
Workshop n°3 : Trying on and field testing the jacket with our small group of enthusiasts

- The gusset is not very nice when not wearing a bag.
- It still lacks volume in the chest to be comfortable and run with your trail vest underneath.
- The pass-through is not well oriented and it is difficult to consult the screen.
- The visor is too flexible, it is necessary to add a piece to stiffen it. This piece will allow water to run off the sides and not directly onto the face.
- The pocket for folding the jacket is not optimized: when the jacket is stored, it is not compact enough.
All this gave us material to think about the points of improvement for the next prototype.
The third prototype and "size set": ready to drop 😎
And that's it! Our jacket is finished at this point!

We'll let you see what it's all about here 😉
Leave a comment